


i thought i would offer up a quick little step by step and a print out for you if you want to make your own at home!
you'll need a couple of things:
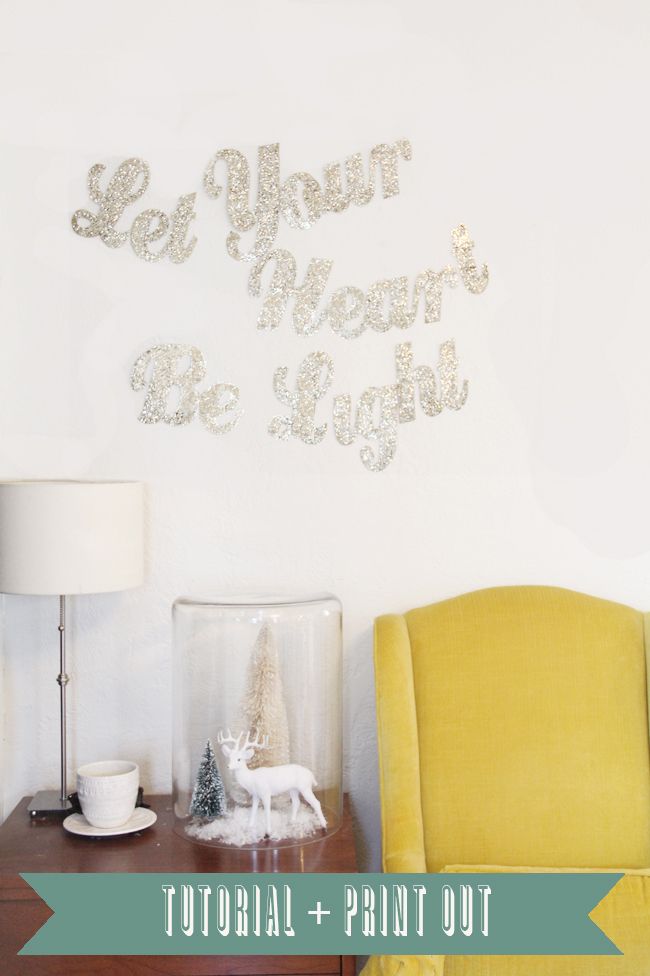
1. a favorite christmas song. mine is "have yourself a merry little christmas". the judy garland version is the best...it makes me itch to watch meet me in st. louis every single time! "let your heart be light" is from one of the first lines in the song, and oh it gets me every time!
2.some supplies: heavy card stock or poster board, a printer, scissors, glue or modpodge, a paintbrush, glitter, tape/string/sticky tack
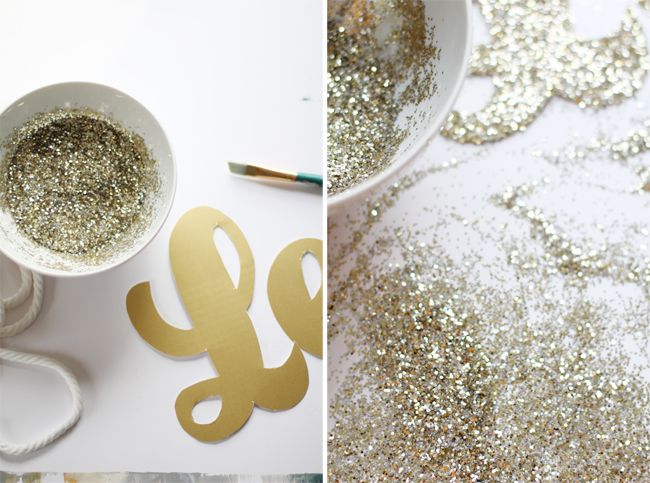
- i picked a font called "creampuff" for the lettering and laid each letter or group of letters out on photoshop. i made sure to print them backwards on heavy card stock so that the printer ink would be on the back side/not showing through the glitter side. and make sure you pick a color of card stock or poster board that will go well with the shade of glitter you pick! i used gold for mine!
(p.s. the files i have for you to print are already facing backwards...just print them onto card stock and cut out and flip them over..they're good to go!)
- cut out the letters or group of letters from the card stock. if you're planning on hanging them from string go ahead and string them up (the string taped to the backside) before you start to add the glitter.
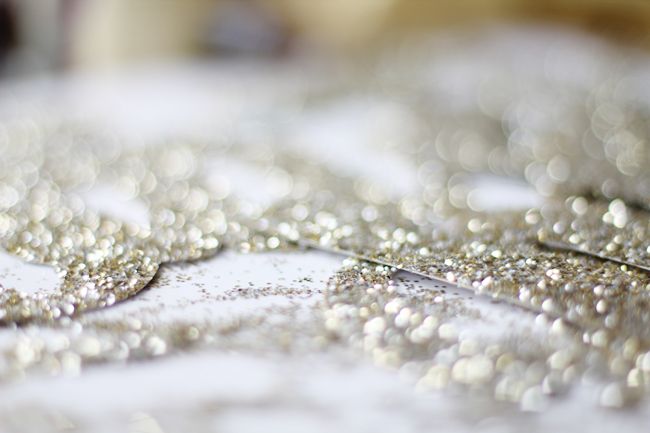
- after cutting each letter or group of letters out, i put on a thin layer of modpodge with a paintbrush and covered the them completely with a mixture of gold and silver glitter
(mixed together in a bowl beforehand)
- allow a few minutes to dry!
i used sticky tack on the backs of my letters and words instead of string..i have plaster walls and it seems to be holding just fine!

i hope this made sense..haha. i'm known for winging things a lot and doing things a bit scatterbrained.
tweak it however you like and i would love to see pictures if any of you decide to try your own!
to download, save, or print the banner letters from my photobucket
click here
(just click on each image separately, make sure it's sized 100%, right click if you're a pc, and print!)
hooray!
p.s. beware of being covered in glitter for days.
how cute! i love the idea and so simple to make too!
ReplyDeletexo,
cb
Katie, that is the sweetest Christmas DIY ive seen! I'd love to try it, reeeeeally hope I have the chance! Thanks for sharing =)
ReplyDeleteo this is just wonderful! And gave me some ideas!
ReplyDelete-grace
http://herumbrella.com
This is the first time I've come across your blog and I love it! This post makes me feel super festive and excited! I am going to try this when I've got a free moment to get glitter everywhere xxxx
ReplyDeleteLove it! Your home looks like the cutest place!
ReplyDeleteThanks for the how to, Katie! I love that line so much I want to keep it up year 'round.
ReplyDeletexo
cortnie
That is soooo pretty! I love how the silver & gold glitter looks when it's mixed. I might need to try this. Thanks for sharing, Katie! ;)
ReplyDeletebeautiful! I want to do this!
ReplyDeleteso pretty! i love your decorations! thank so much for sharing! :) -Lo
ReplyDeleteThanks for this, lady! I'm totally doing it... how could I say no to anything that involves pretty letters and glitter? :)
ReplyDeleteI love your wall art!
ReplyDeleteI have a silver, glitter banner that says "Merry Christmas" and it is one of my favorite decorations.
I love your idea of taking words from a favortie carol or song.
I'm insipred to make another one.
And wouldn't they make great gifts?
Thank you for sharing the fun idea.
Love from,
Greta
love this, thanks!
ReplyDeletelindsay
what the what? this is super awesome! going to make this and then enjoy the glitter that is left behind for years to come!!
ReplyDeletewhat a good idea! it's so pretty :) thanks for the how-to.
ReplyDeleteBeautiful! Love it!
ReplyDeleteThanks for the tutorial. This is gorgeous and I am still trying to decorate for Christmas.
ReplyDeleteI love this Katie. What a great tutorial. You are the cutest. =)
ReplyDeleteKacie
Awesome idea. Found via Pinterest.
ReplyDeleteThis is very pretty! That's my favorite Christmas song too! Found you via Pinterest. Thanks for sharing!
ReplyDeletelove that it is so sparkly! thank you for the tutorial! :)
ReplyDeleteLove love love!!! Totally up my alley!! Thanks bunches for sharing!!
ReplyDeletexo Jenny
adorable =)
ReplyDeleteI love this! Where did you get the creampuff font? Would you mind sharing please? :)
ReplyDeleteohmygosh, this is brilliant. and pretty! i'll be linking :) thanks so much for sharing your creativity!
ReplyDeleteAMAZING ! Where did you get the creampuff font please ?!?
ReplyDeleteThis is beautiful and evokes such a nostalgic feeling, I love it! Thank you for the download!
ReplyDeletethanks for the inspiration http://statigr.am/viewer.php#/detail/453112142_3811398
ReplyDeleteI just printed mine off to make this year! Found you through pinterest and just love your blog! :)
ReplyDeletewill make w pink glitter for valentines, put on my window for all passersby in williamsburg, BK to see. thank you!
ReplyDelete